Download Eclipse IDE for Java Developers
In this tutorial, we will understand how to download Eclipse IDE for Java developers. Before going to download and install Eclipse IDE, let’s understand first in brief about Eclipse.
Eclipse is an IDE (Integrated Development Environment) supported by IBM. It is used to develop software in any language such as Java, Android, C/C++, PHP, Python, Perl, and other web project developments via extensible plug-ins. It was open-sourced in November 2001.
Eclipse Foundation is an organization that controls eclipse independently. Today, it can be run in the most popular operating system like Windows, Mac OS, and Linux.
Eclipse is the most popular for Java application development (Java SE and Java EE). Therefore, first, you must install a recent version Java on your PC.
You can download and install the Java Software Development Kit (JDK) step by step from this link: Download and Install Java Development Kit in Windows
System Requirements
Before going to download Eclipse IDE, it’s essential to ensure that your computer system meets the minimum requirements. Generally, Eclipse can run on most modern computers, but specific plugins or workloads might have additional requirements.
The general system requirements for downloading and installing Eclipse IDE are as follows:
- Operating System: Windows, macOS, or Linux
- Processor: 1 GHz or higher
- RAM: 2 GB or more
- Disk Space: 500 MB for Eclipse IDE installation and additional space for your projects
How to Download Eclipse IDE for Windows 11
You follow all the steps given below to download and install Eclipse IDE on your computer pc.
1. Visit https://www.eclipse.org/downloads and download the latest version of “Eclipse IDE for Java Developers”. Make sure to choose correctly between Windows 32 Bit and 64 Bit versions.

2. Once the download is completed, double-click on the file to Install the Eclipse. You may get a security warning to run this file. Select the Run option.
3. A new Eclipse Installer packages window will open to choose Eclipse IDE. Select and click on Eclipse IDE for Java Developers to install as shown in the below screenshot.
You can also search for the package you want to install by scrolling the list.
4. After that, a new window dialog box will open on your screen. You can specify any destination folder present on your system you want Eclipse to be installed.
Now click on the Install button to start the installation. The Set up is ready to install Eclipse in the directory shown in the below screenshot.

5. The setup will ask you to accept the Eclipse Foundation Software Agreement. Just click on Accept to continue the installation process.
Now, wait for some time to be installing Eclipse on our system.
6. Once the installation process will be successfully completed, a new window dialog box will appear on your screen as shown in the below screenshot.
On that window box, click on Launch button to launch the eclipse.

How to Configure Eclipse for Java?
Follow all the steps to configure Eclipse for Java programming:
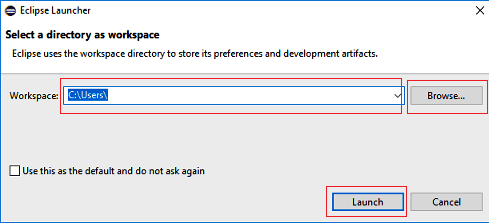
1. When you will start Eclipse for the first time, it will ask you where you want your workspace as shown in the below screenshot.
Workspace is that folder in your system where Eclipse will place data of your new projects you create. You can change the folder of the workspace by using browser if you want.
2. Now, you will see the “Welcome” on your screen. Just close the “welcome” tab to open the regular editor.
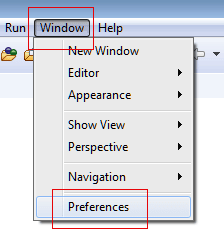
3. Now go to “Windows” at the top of Eclipse and choose the “Preferences” option.
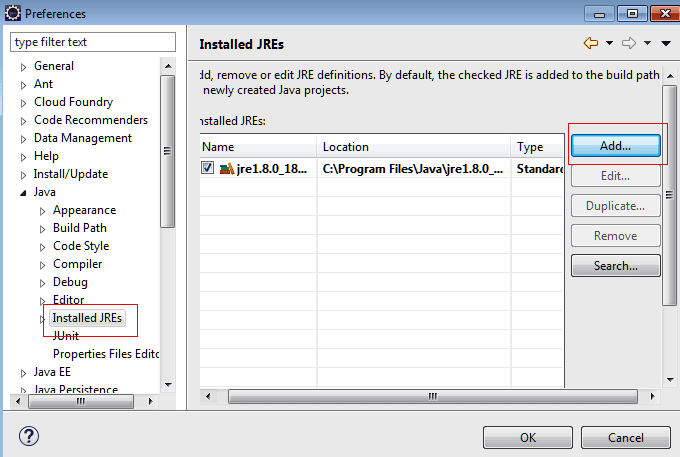
4. On the left-hand side, choose Java, click Install JREs and click the Add… button on the right side.
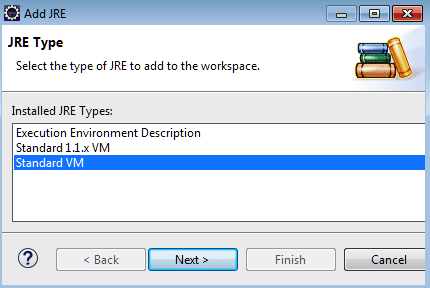
5. On the first page of the Windows popup wizard, choose “Standard VM”, then click on the Next button.
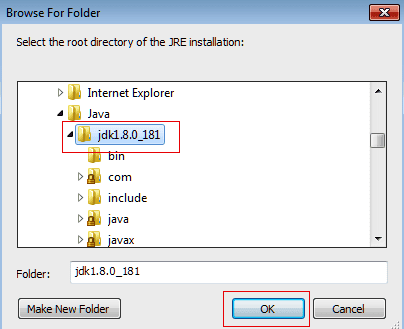
6. Next click on Directory, browse the folder for Java in program files, and select the root directory of the JRE installation, then press OK. You can see in the below screenshot.
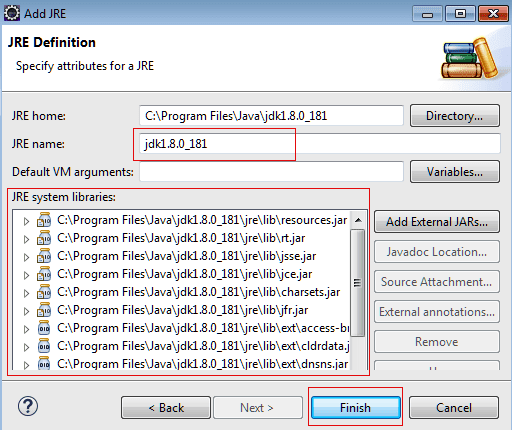
7. On the next page, verify JRE name and its all the System libraries jars are added properly by Eclipse itself or not. After that click Finish.
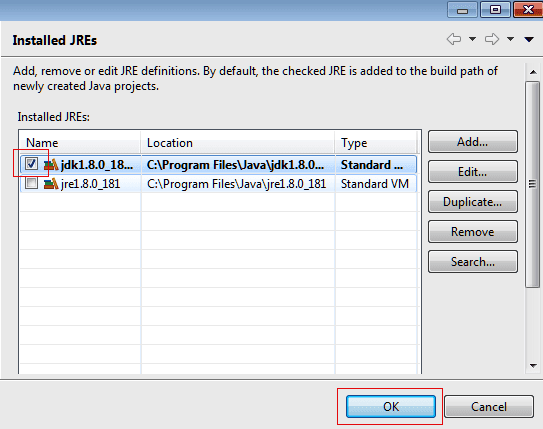
8. Check just created JDK added to build path and then press OK.
Installing Plugins and Extensions in Eclipse IDE
Eclipse’s real power lies in its extensibility. We can enhance its functionality by installing plugins and extensions. There is a vast collection of Eclipse plugins available for various purposes, from code analysis to version control integration. To install plugins, navigate to the “Help” menu and select “Eclipse Marketplace” or “Install New Software.”
Tips for Eclipse IDE Productivity
To make the most out of Eclipse IDE and boost your productivity, consider the following tips:
- Use keyboard shortcuts to perform actions quickly.
- Customize code templates and snippets to reduce repetitive typing.
- Utilize code assist and content assist features to speed up coding.
- Take advantage of the built-in refactoring tools for code restructuring
Troubleshooting Common Issues
Even with a robust IDE like Eclipse, you may encounter some common issues during development. You can resolve some problems by adjusting settings, updating plugins, or cleaning the workspace. If you face persistent problems, go to online developer forums or the Eclipse community for solutions.
FAQs on Eclipse IDE
Q 1. Is it possible to use Eclipse IDE for languages other than Java?
A: Yes, we can use Eclipse IDE for other languages than Java. IDE supports many programming languages, such as C, C++, Python, PHP, etc. You need to install only language-specific plugins to enable support for the desired language.
Q2. Is Eclipse IDE free to use?
A: Eclipse IDE is an open-source software application and is available for free under the Eclipse Public License. Therefore, we can use it for free.
Q3. Can we customize the Eclipse IDE interface?
A: Yes, Eclipse provides a high degree of customization. You can rearrange and resize views, change color schemes, and configure keyboard shortcuts according to your preferences.
Q4. Is it possible to contribute to Eclipse IDE’s development?
A: Absolutely! Eclipse IDE is a community-driven project. We can actively contribute to its development by reporting bugs, suggesting improvements, and even submitting code changes.
Q5. Where can we find additional resources for learning Eclipse IDE?
A: The Eclipse community provides extensive documentation, tutorials, and forums where we can easily find additional resources to deepen your knowledge of Eclipse IDE.
Hope that this tutorial has covered all the important points concerning download and install Eclipse IDE for Java developers. I hope that you will have installed Eclipse IDE on your PC successfully and enjoyed this tutorial.
Thanks for reading!!!