Write, Compile, and Run Java Program in Eclipse
In this tutorial, we will learn how to write, compile, and run a Java program in Eclipse IDE and NetBeans step by step.
Writing a Java program in Eclipse or NetBeans can be very exciting for you, especially if you are new to programming or just starting your coding journey. You can write, edit, compile, run, and debug Java Programs using Eclipse and NetBeans.
Eclipse and Apache NetBeans are two popular, free integrated development environments (IDEs) for writing Java programs. Both are easy to learn if you follow simple instructions.
We recommend that you use either one for writing Java programs. In the first section, we will use Eclipse to develop a simple Java program.
We will guide you all essential instructions step by step for new users to create a project, create a class, compile, and run a class in Eclipse. The use of NetBeans will be introduced in the next section.
Requirements to Write Simple Java Program in Eclipse
The following are the essential steps required to develop and execute a Java program:
- Install the Eclipse IDE. If you don’t have installed it, download the Eclipse IDE and install it. For this, go to this tutorial: Download and Install Eclipse IDE for Java
- Writing the Java program.
- Compiling Java program.
- Run Java program.
We hope that you have successfully installed Eclipse IDE by following all instructions. Now, we will understand how to create Java project in Eclipse.
How to Create Java Project in Eclipse?
Before creating a Java program in Eclipse IDE, you must first create a project. A project is like a folder structure that contains Java source files, packages, libraries, and other supporting files. You only need to create a project only once for each application.
Follow all the steps below to create a Java project in Eclipse:
Step 1: Open the New Java Project Wizard
First of all, open Eclipse IDE and click on File > New > Java Project. This will display the New Java Project wizard window, as shown in Figure.

Step 2: Select Java Project
A new project wizard will display on your computer screen. In the wizard, select Java project and then click on Next button, as shown in the below figure.

Step 3: Enter the Project Name
Type Java Project in the Project name field. As we type, the location field will automatically set to the default workspace. You may also customize the location for your project by unchecking Use default location.
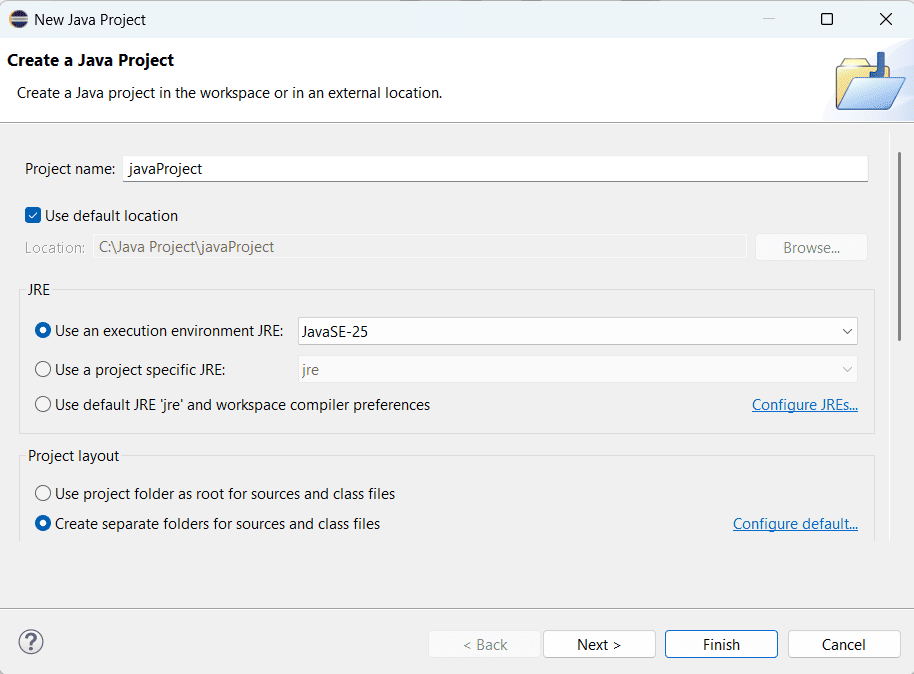
Step 4: Select the JDK Version
Make sure the correct JRE or JDK version is selected. This ensures your project uses the correct Java version.
Step 5: Click Finish
Click on the Finish button to create the project. Eclipse will create the project and display it in the Package Explorer. You will see the following automatically created items:
- Project folder
- src folder (for source code)
- JRE System Library
How to Create Java Package in Eclipse?
A package is used to organize related classes into a proper folder structure. Follow all the steps below to create a package in Java in Eclipse IDE:
Step 1: Open Package Wizard
Right-click on the newly created Java project > New > Package. A new Java package wizard will open as shown in the below figure.
Step 2: Enter Package Name
Type a package name “basicJava”. Note that package names should be lowercase by Java naming convention. You can give other package name as per need.
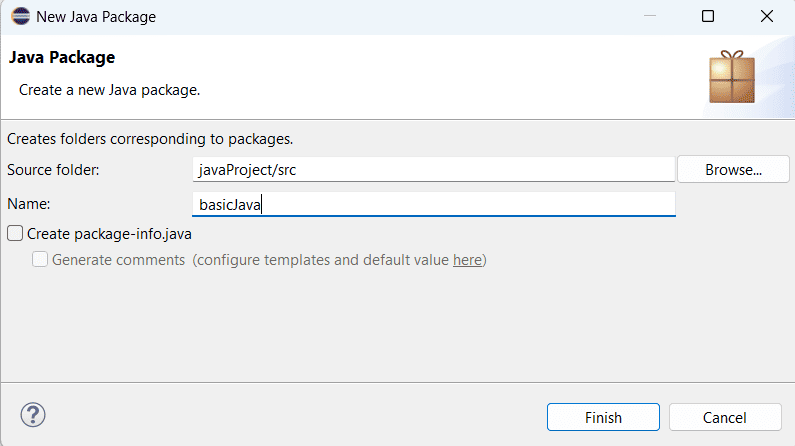
Step 3: Click Finish
Click on Finish button. A package folder named “basicJava” is created inside the src folder and displayed in the Package Explorer on the left-side.
How to Create Java Class in Eclipse?
After creating a package in your Java project, the next step is to create a Java class. A class contains the program code and the main() method from which the program starts execution.
Follow the steps below to create a Java class in Eclipse:
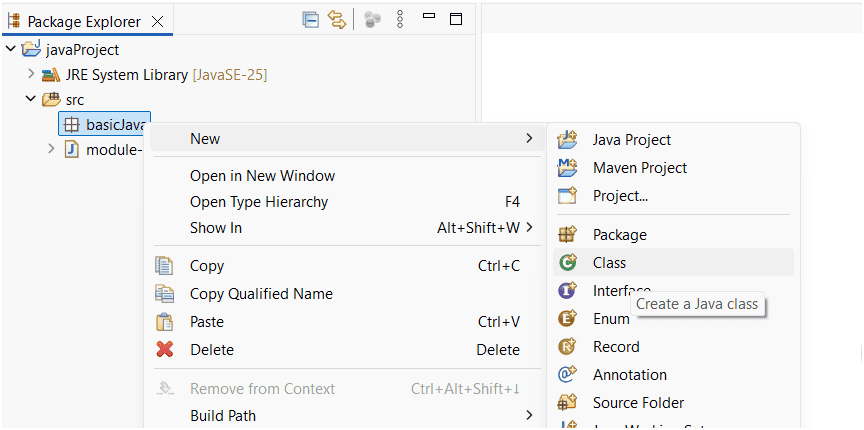
Step 1: Open the New Java Class Wizard
Right-click on the package name basicJava in the Package Explorer, and select New > Class to display the New Java Class wizard.
Step 2: Enter the Class Name
Type Hello in the Name field and check the checkbox public static void main(String[] args) as shown in the below figure. This option automatically creates the main method, which is the entry point of the Java program.

Step 3: Click Finish
Click on Finish button to produce the template for a new class file named Hello.java. This file will appear under the package named basicJava in the Package Explorer on the left-hand side.
Step 4: View the Generated Template
Eclipse automatically generates the following template:
package basicJava;
public class Hello {
   public static void main(String[] args) {
    // TODO Auto-generated method stub
   }
}
Now you can write the first simple Java program inside the main() method in the template as written in the following example code.
package basicJava;
public class Hello {
   public static void main(String[] args)
   {
      System.out.println("Hello World");
   }
}
We have developed a simple Java program in the Eclipse IDE. The next step is compiling and executing Java program.
How to Compile and Run Java Program in Eclipse?
In Eclipse IDE, compilation happens automatically when you save the program. You only need to run the program to execute it.
Follow the steps below to run a Java program in Eclipse:
Step 1: Save the Program
After writing the Java program, press Ctrl + S. Eclipse will automatically compile the program. If there are errors, they will be shown in the editor.
Step 2: Run the Java Program
Right-click on the class file (for example, Hello.java) in the Package Explorer. Then select: Run As > Java Application
Step 3: View the Output
The output of the program will be displayed in the Console pane at the bottom of the Eclipse IDE.
Output:
Hello World
How to Create Java Project on NetBeans?
First of all, download and install the latest Apache NetBeans and the Java Development Kit (JDK) in your computer system as per computer configuration. For this go to this tutorial: Download NetBeans
Before developing a Java program, you need to first create a project. Follow the steps below to create a Java project in NetBeans:
- Choose File > New Project to display the New Project dialog box.
- Select Java in the Categories section and Java Application in the Projects section. Click on Next button to display the New Java Application dialog box.
- Type the project name “basicJava” in the Project Name field. Use lowercase without spaces.
- Browse Project Location field if needed, or use the default location.
- Make sure the correct JDK version is selected.
- You check Use Dedicated Folder for Storing Libraries.
- You may uncheck Create Main Class if you want to create the class manually later. However, the checked is recommended unless you have a specific reason.
- Click on the Finish button. NetBeans will create the project and display it in the Projects window.
Creating a Java Class in NetBeans
After creating the project, follow these steps to create a Java class:
- Right-click on the project name in the project pane to display a context menu. Select New > Java Class to display the New Java Class dialog box.
- Type Hello in the Class Name field.
- Type package name such as basicJava. Avoid using the default package. Always use a named package. If you leave the Package field blank. It will create a class in the default package.
- Click on Finish button to create class file. NetBeans will create the class file named Hello.java under the package basicJava.
- Modify the code in the Hello class according to the above example code.
How to Compile and Run Java Program in NetBeans?
To run Hello.java, right-click Hello.java to display a context menu and select Run File, or simply press Shift + F6. The output is displayed in the Output pane at the bottom of NetBeans.
The Run File command automatically compiles the program if the program has been modified.
Best Practices for Java Programming in Eclipse or NetBeans
To write clean and efficient code in Eclipse, consider these best practices:
- Use meaningful names for variables, methods, and classes.
- Organize your code into packages to improve maintainability.
- Regularly format your code using Eclipse’s built-in formatter.
Key Points to Write Java Program in Eclipse IDE
- Visit the Eclipse official website and download the latest version of Eclipse IDE suitable for Java development.
- Install the latest version of Java Development Kit (JDK) from the Oracle website on your computer system if it’s not already installed.
- Set the environment variable to the JDK installation path.
- Open Eclipse after installation and go to File > New > Java Project.
- Enter the project name and configure the JRE (Java Runtime Environment) if needed. Click Finish.
- Create a package by right-clicking on the src folder in your project. Enter the package name.
- Create a Java class by right-clicking on the package name and enter the logical class name.
- Check the option to include the public static void main(String[] args) method if this is your main class. Click Finish.
- Now write your first Java program in the class and run it.
FAQs on Eclipse IDE
1. Is Eclipse suitable for Java beginners?
Yes, Eclipse is an excellent choice for Java beginners because it provides a user-friendly interface and various key features to support learning and development.
2. Does Eclipse IDE work on all operating systems?
Eclipse is a cross-platform IDE. Therefore, you can install on all operating systems, such as Windows, macOS, and Linux.
3. Can we customize the Eclipse interface?
Yes, Eclipse allows us to easily customize the interface by rearranging views, adding shortcuts, and installing themes.


