How to Download & Install PyCharm on Windows
In this tutorial, we are going to see a step by step guide on how to download and install PyCharm IDE on Windows for Python.
PyCharm is a full-fledged IDE (Integrated Development Environment), used by many developers around the world for writing Python code.
It is a cross-platform editor developed by JetBrains company. PyCharm IDE provides many features, such as rich code analysis and completion, syntax highlighting, unit testing, code coverage and error finding. It provides all the significant tools we need for productive Python development.
Also, the professional edition of PyCharm supports Python web frameworks, such as Django, web2py, and Flask. It provides amazing integration with Docker for running the code over them.
Download and Install PyCharm IDE
Follow all the steps below to download and install Pycharm IDE on Windows.
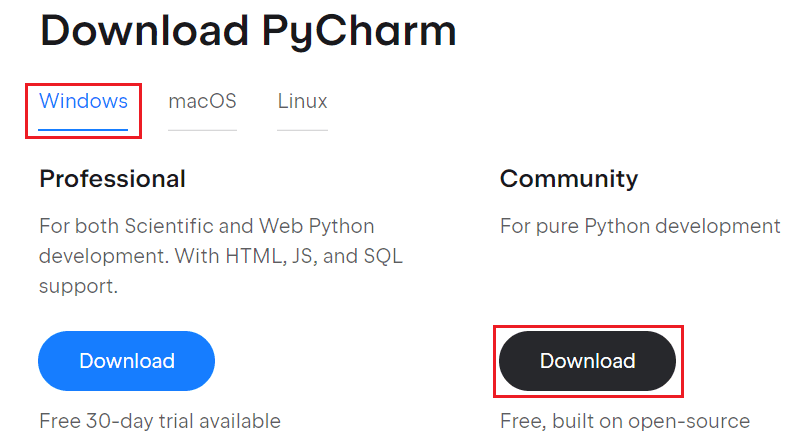
Step 1) Visit the PyCharm download page (https://www.jetbrains.com/pycharm/download/) and choose your platform for Windows, MacOS, and Linux.
Click the “DOWNLOAD” link either the Community Edition (free forever) or the Professional Edition (the Community version is completely good for running the codes in this tutorial).
Step 2) Once the download is complete, install the PyCharm software as usual on your computer system. Click “Next” to start the setup wizard.

Step 3) Choose the install location (folder) in which you want to install PyCharm IDE. Setup will install PyCharm community edition in the below folder.
To install in a different folder, click Browse and choose another folder. That is, change the installation path if required. Click “Next” to continue.

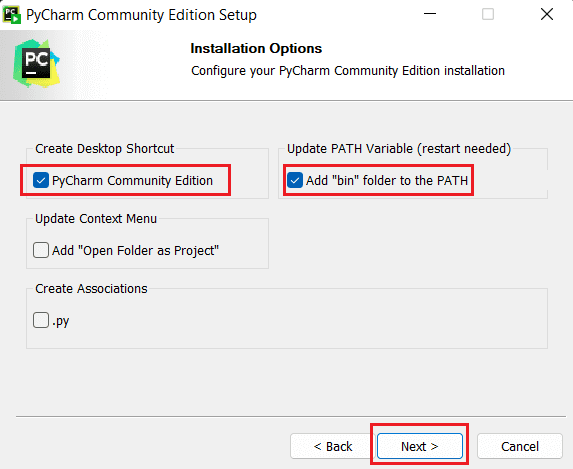
Step 4) On the next screen, choose 32- or 64-bit launcher (depending on your operating system). This will create a desktop shortcut if you want and click on “Next” to continue.
Step 5) Choose the start menu folder for PyCharm shortcuts. Keep selected JetBrains and click on “Install” to continue the installation process.

Step 6) Wait for the installation process to finish. Once the installation process is completed, you should receive a message on the screen that your computer must be started in order to complete the installation of PyCharm Community Edition. Click on the reboot now.

Step 7) After the rebooting your computer, click on the PyCharm shortcut icon on the desktop. On clicking, JetBrains community edition terms message will come on the screen. Click on the check box and on “continue” as shown in the below screenshot.

Step 8) After you click on “continue” the following welcome message will come on the screen as shown in the below screenshot.

Hurray! you have successfully installed PyCharm Community Edition on your Windows. Now, it’s time to create your first Python Program to display “Hello World” on the screen. So, let’s understand step by step how to write my first Python program in PyCharm editor.
Creating Your First Python Program : Hello World
In this section, we will learn step by step how to write our first Python program in PyCharm editor. Hope that you will have successfully completed your Python installation and setup.
Step 1) Open PyCharm editor. You will see the welcome screen for PyCharm. To create a new project to start from scratch, click on “New Project”, as shown below.

Step 2) Now you will need to choose a location where you want the project to be created. In my case, we have selected C:\ location and given a meaningful name “Python Project”, as shown in the below screenshot.

If you do not want to change location, then keep it as it is but at least name a meaningful project name like “Python Project” or “FirstProject”. After naming your project, click on “create” to continue.
Step 3) Now go to the “Python Project” and right click on it. Go to the “New” and then select the “Python File”, as shown in the below screenshot.

Step 4) A new pop up will appear on the screen. Now type the meaningful name of the file you want (Here we named “HelloWorld”) and press Enter key.
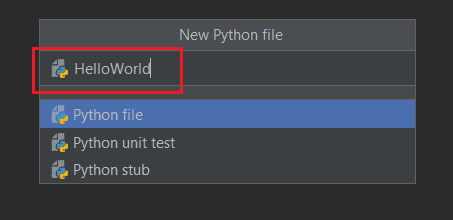
Step 5) A file with named “HelloWorld” with .py extension will make on the left side below on the Python project folder. Now write your first simple Python program in the PyCharm editor. You write the following code to print “Hello World” on the Python console.
print("Hello World")
Step 6) Now go to “Run” menu or press Shift + F10 to run your first Python program. You can see the output of your first python program at the bottom of the computer screen.
Output:
     Hello World
Congratulations, you have successfully created your first python program in PyCharm editor and run it. Now run the following code and see the result on the screen.
print("Hello World")
person = input("What is your name?")
print("Hello,", person)
Output:
      Hello World
      What is your name? Deepak
      Hello, Deepak
In this tutorial, we have covered step-by-step instructions on how to download and install PyCharm editor on Windows. By following these steps, you should have successfully installed PyCharm and written your first Python program in the editor. Here is a brief summary:
- Download PyCharm from the official JetBrains PyCharm website.
- Run the installer.
- Follow installation prompts in the installation wizard.
- Once the installation is complete, launch PyCharm from the Start menu or desktop shortcut.
- Set up your first project.
- Write and run your first Python program.
Thank you for following this tutorial and happy coding!!!