In this tutorial, we will learn how to install MySQL on Windows. Installing MySQL on Windows is one of the first and most important steps for anyone who wants to learn MySQL database.
Whether you are a student, developer, or running a project, this complete guide will help you install MySQL on Windows easily so that you can get started without errors.
System Requirements for MySQL Installation
Before installing MySQL on Windows, make sure your system meets these requirements:
- Operating System: Windows 10 / Windows 11 (64-bit recommended)
- RAM: Minimum 4 GB (8 GB recommended)
- Disk Space: At least 2 GB free space
- Internet Connection: An active internet connection is required for downloading the MySQL installer.
Steps to Download and Install MySQL
Now, let’s break down MySQL software download steps and see how to install MySQL on Windows 11 step-by-step.
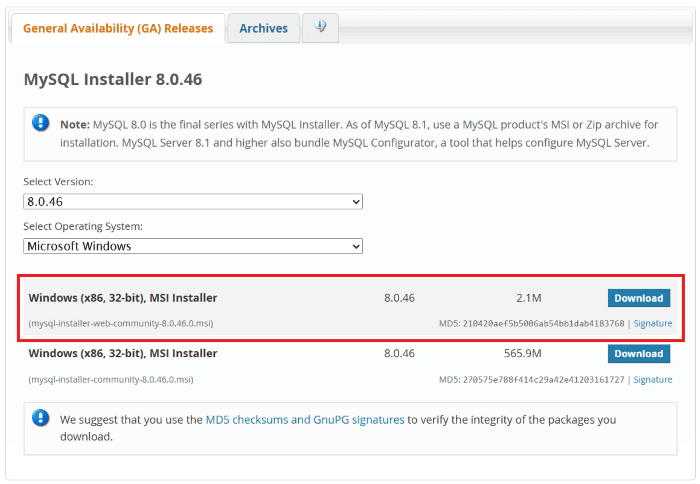
Step 1: Download MySQL Installer
Follow these steps to download MySQL:
- Open your preferred web browser.
- Go to the official MySQL website: https://www.mysql.com/downloads/.
- Click on “MySQL Community Edition,” which is the free, open-source distribution of MySQL, licensed under the GNU General Public License (GPL).
- Navigate to downloads for MySQL Installer for Windows.
- Choose to download the MySQL Installer (Web Community version).
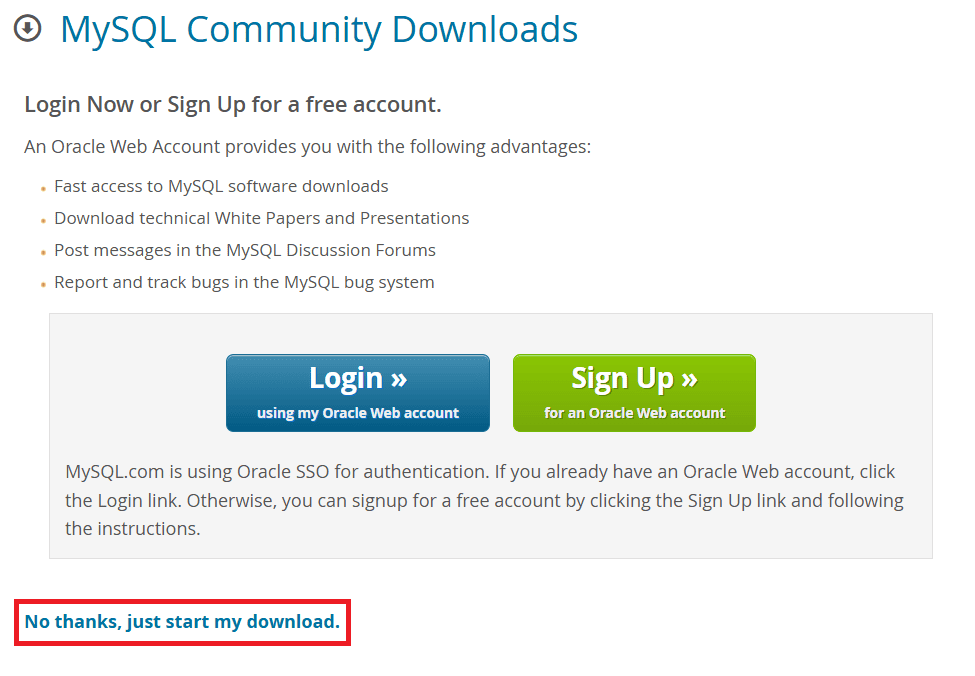
Step 2: Go to the Downloads Section
Now click on the “No thanks, just start my download” link to proceed with MySQL downloading.
Step 3: Run MySQL Installer
After downloading the MySQL installer (.exe file), navigate to your Downloads folder, locate the file, and double-click to run the installer.
Step 4: Choose Setup Type
During installation, you will see multiple setup types that suit your use case:
- Developer Default (Recommended)
- Installs MySQL Server, Workbench, Shell, and tools
- Server Only
- Client Only
- Full
- Custom
Choose Developer Default because it is suitable for learning and development purposes. Click “Next” to proceed.
Step 5: Check Requirements
The installer will check for required dependencies like the following:
- Visual C++ Redistributable
If anything is missing, the installer can auto-resolve some issues.
- Click “Execute” to install required components.
Then click Next.
Step 6: MySQL Downloading Products
Click “Execute” to begin the download of the components you selected. Wait a few minutes until the download is completed before moving forward. Once completed, click Next.
Step 7: MySQL Installation
Once the downloading of components is completed, click “Execute” to start the installation process. MySQL will be installed on your Windows system. Then, click Next to proceed.
Step 8: Navigate to Few Configuration Pages
Proceed with “Product Configuration” > “Type and Networking” > “Authentication Method” Pages by clicking the “Next” button.
Step 9: Create MySQL Accounts
Enter the password for the MySQL root user. Ensure it is strong and memorable. Click the “Next” button to proceed.
Step 10: Server File Permissions
During installation of MySQL, the installer controls who can access MySQL data files on your system. It is mainly about security and access control. Always go with default/recommended settings and click on the “Next” button.
Step 10: Apply Configuration
Click the “Execute” button. MySQL will automatically perform the following tasks one by one:
- Writing configuration file (my.ini)
- Updating Windows Firewall rules
- Adjusting Windows service
- Initializing database
- Updating permissions for data folder and related server files
- Starting the server
- Applying security settings
- Updating the Start menu link
Wait until all steps show “Complete”. Click the “Finish” button.
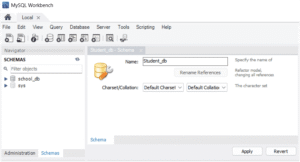
Step 11: Launch MySQL Workbench
Once the installation is complete, click the “Finish” button. Congratulations! MySQL is now successfully installed on your Windows system.
After installation of MySQL, perform the following steps:
- Open MySQL Workbench
- Click on Local Instance MySQL80
- Enter the root password
- Click OK
If you installed MySQL, but MySQL Workbench is missing, a few common things may have happened:
- Check if only the MySQL server is installed. Sometimes only the MySQL server gets installed, not Workbench.
- Open Windows Search and type MySQL Workbench. See if it appears. If not, it may not have been installed.
- Check in the MySQL installer. Perform the following steps.
- Open MySQL Installer
- Click “Add or Modify.”
- Under Applications, select MySQL Workbench with installed version.
- Click the Next button and Execute to install.
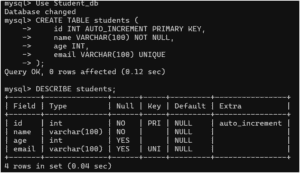
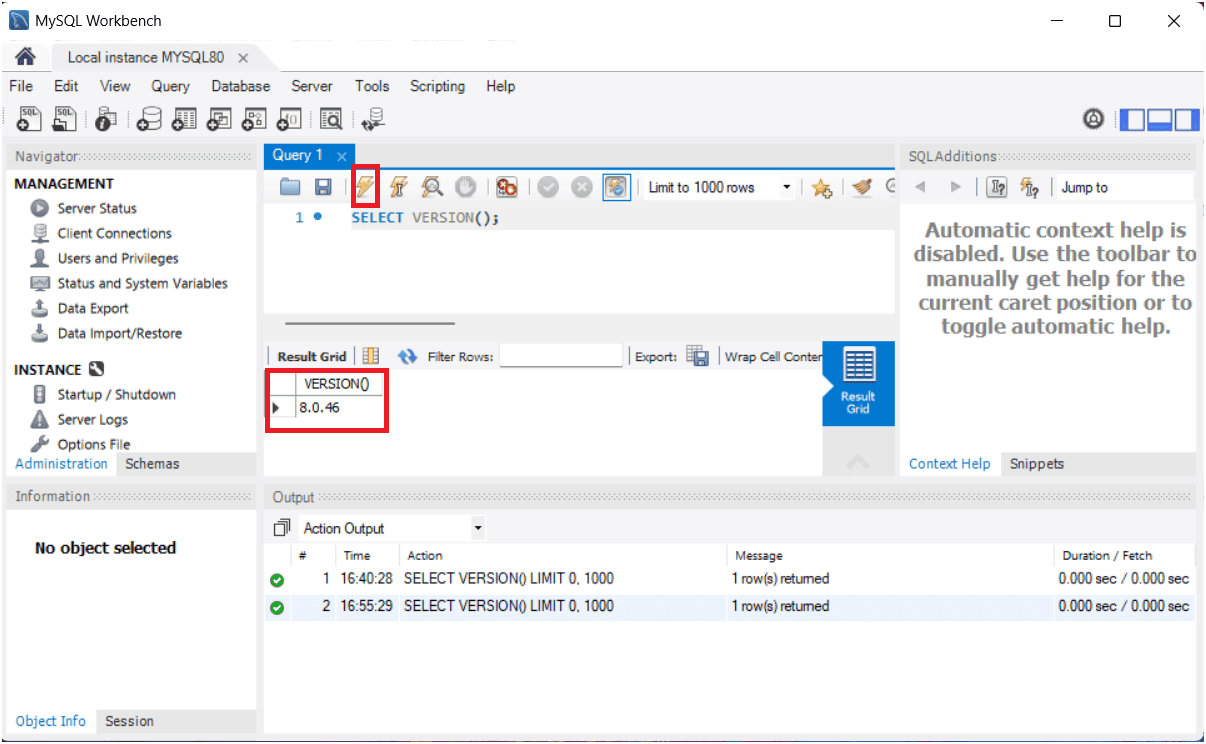
Step 12: Test MySQL Installation
Open MySQL Workbench and click your Local instance MySQL80 connection (or similar name). Now enter your root password if asked.
In the SQL editor, type:
SELECT VERSION();
Now click the lightning bolt (Execute) button or press Ctrl + Enter to run the current query.
Expected Output:
At the bottom in the Result Grid, you should see something like this:
VERSION()
8.0.36
If MySQL returns a version number, your installation is successful.
Troubleshooting Common MySQL Installation Issues
If you encounter issues during the MySQL installation process, try these common solutions:
- Error: Port 3306 Is Already in Use: MySQL uses port 3306 by default. If another application is already using this port, change the port number during the configuration step or stop the conflicting application.
- MySQL Service Fails to Start: Ensure that the Windows Firewall is not blocking the MySQL service. Also, check Windows Services and verify that the MySQL Server service is running. If it is stopped, try restarting it.
- Invalid or Forgotten Root Password: If you have forgotten your root password, you can reset it by following the official steps provided in the Oracle Corporation MySQL documentation.
- Missing Visual C++ Dependencies: Some versions of MySQL may require Microsoft Visual C++ Redistributable packages. If installation fails, install the required dependencies and try again.
Advantages of Installing MySQL
There are the following advantages of installing MySQL:
- Free and open-source.
- Easy to install and use.
- Supports large databases.
- High performance.
- Widely used in web development.
Conclusion
Installing MySQL on Windows is a simple process if you follow the correct steps. In this guide, you learned how to download, install, configure, and test MySQL successfully.
Now you are ready to start working with databases and writing SQL queries. Always remember your root password and back up your databases regularly.