In this tutorial, we will learn how to create a table in MySQL. Creating tables in MySQL is one of the most important tasks when you are organizing and managing data in a database.
A table is a structured collection of data organized into rows and columns, similar to a spreadsheet. In simple terms, a table stores data in rows and columns.
Each row, also known as a record, represents a single entry. Each column, also known as a field, defines a specific attribute of the data. For example, a student table may have the following columns:
- ID
- Name
- Age
- Course
Basic Syntax to Create a Table in MySQL
To create a table in a MySQL database, we use the CREATE TABLE SQL statement. The general syntax is:
CREATE TABLE table_name (
   column1 datatype constraints,
   column2 datatype constraints,
   column3 datatype constraints
);
In this syntax:
- CREATE TABLE → This keyword is used to create a new table.
- table_name → This is the name of the table you want to create.
- ( ) → Inside the parentheses, you define the columns of the table.
- column1, column2… → These are the names of the columns in the table.
- datatype → Specifies what type of data to be stored in the column (e.g., INT, VARCHAR, DATE, etc.).
- constraints → Define rules for the data in the column, such as NOT NULL, UNIQUE, PRIMARY KEY, and FOREIGN KEY. These are optional but very important for maintaining data integrity.
Common Data Types in MySQL
Here are some frequently used data types:
- INT → Integer numbers
- VARCHAR(n) → Variable-length text
- CHAR(n) → Fixed-length text
- DATE → Date values
- FLOAT / DOUBLE → Decimal numbers
- BOOLEAN → True or False
Rules for Creating Tables in MySQL
There are several important rules for creating tables in MySQL:
- A table name must be unique within a database. Always use meaningful table names such as students, employees, etc.
- Column names must be unique within a table. They should be simple, clear, and easy to read.
- Always define appropriate data types for each column. Use VARCHAR instead of CHAR when you need flexible text length.
- Use constraints to maintain data integrity and accuracy.
- Avoid using reserved keywords as table names or column names.
Create a Table Using MySQL Command Line Client
The following are the steps to create a table using the MySQL Command Line Client:
Step 1: Open MySQL Command Line Client
Run the following command to log in to the MySQL command prompt:
mysql -u your_username -p
Replace your_username with your MySQL username. After running this command, you will be prompted to enter your password.
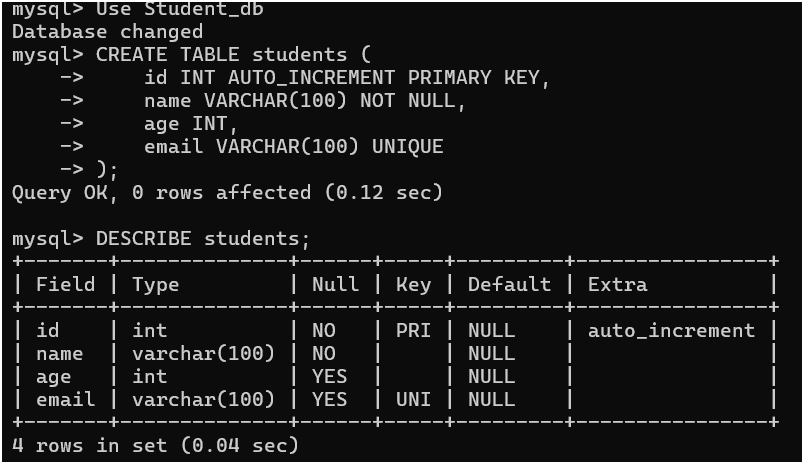
Step 2: Select a Database
Before creating a table in MySQL, you must select a database:
USE database_name;
Replace database_name with the name of your database.
Step 3: Create a Table
Once you are connected to the database, run the following query to create a students table:
CREATE TABLE students (
    id INT AUTO_INCREMENT PRIMARY KEY,
    name VARCHAR(100) NOT NULL,
    age INT,
    email VARCHAR(100) UNIQUE
);
This table stores student information such as id, name, age, and email. In the above SQL query:
- CREATE TABLE → This command is used to create a new table in the database.
- students → This is the name of the table.
- ( → Starts the definition of columns.
- id → Name of column.
- INT → Data type, which stores integer values only.
- AUTO_INCREMENT → Automatically increases the value for each new record (1, 2, 3, …).
- PRIMARY KEY → Uniquely identifies each row in the table. It cannot contain duplicate or NULL values.
- name → Column name.
- VARCHAR(100) → Stores text up to 100 characters.
- NOT NULL → This field cannot be empty.
- age → Column name.
- email → Column name.
- VARCHAR(100) → Stores email text.
- UNIQUE → Ensures that all email values are different (no duplicates allowed).
- ) → Ends the column definitions.
- ; → Ends the SQL statement.
Step 3: Verify the Table Structure
To verify that the table has been created successfully, you can use the DESCRIBE statement to view the structure of the students table.
DESCRIBE employees;
Output:
By following these steps, you have successfully created a table using the MySQL Command Line Client. The table is now ready to store data in the database.
Creating a Table Using MySQL Workbench
MySQL Workbench provides a simple and user-friendly way to create tables visually. It allows you to design tables without writing SQL commands. The following are the steps to create a table using MySQL Workbench GUI:
Step 1: Open MySQL Workbench and Connect to the Server
Launch MySQL Workbench and establish a connection to your MySQL server.
Step 2: Create a Database (If Necessary)
Create a database (schema) if you have not already created one.
Step 3: Select the Database
Select the database where you want to create the table.
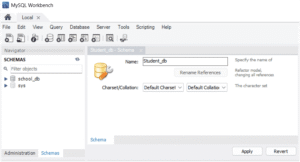
- Click on the “Schemas” panel on the left-hand side of the screen.
- From the list of databases, select the one you want to work with. For example: school_db
Step 4: Create the Table
Enter the table details and create the table.
- Click on the “Create a New Table” icon in the toolbar.
- Enter the table name, column names, data types, and constraints.
- For example, create a table named student_management.
Now add columns one by one:
| Column Name | Data Type | Settings |
|---|---|---|
| student_id | INT | ✔ PK, ✔ NN, ✔ AI |
| student_name | VARCHAR(100) | ✔ NN |
| VARCHAR(100) | ✔ UQ | |
| phone | VARCHAR(15) | (optional) |
| course | VARCHAR(50) | (optional) |
| admission_date | DATE | (optional) |
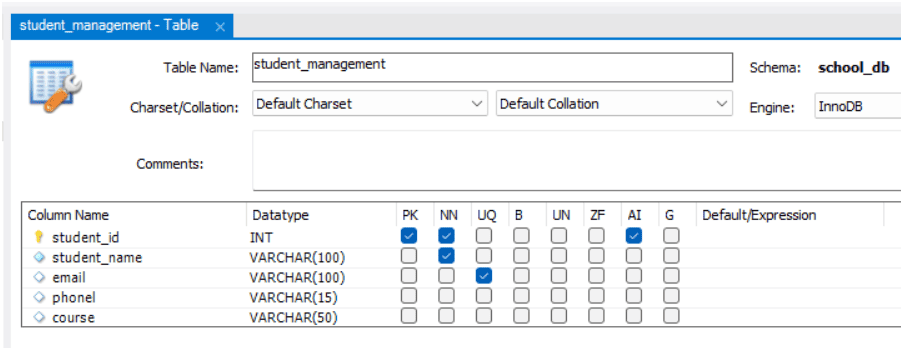
Hence, the student_management table is successfully created using MySQL Workbench GUI.
Step 5: Apply Changes
- Click on the Apply button. A SQL preview will appear on the screen.
- Click Apply again and then click on the Finish button.
Step 6: Verify the Table
- Expand your database.
- Expand the Tables section.
- You will see the student_management table listed there.
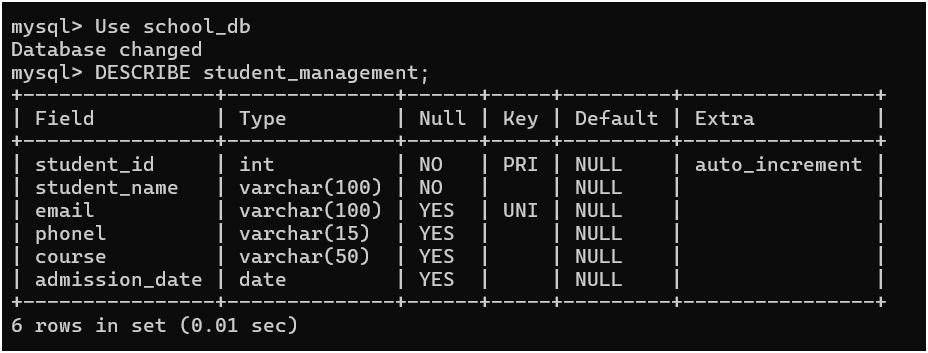
Once the table is created, you can also verify it by using the DESCRIBE command in the MySQL Command Line Client.
- Open the MySQL Command Line Client and connect to your server.
- Select the database:
USE school_db;
- Run the following command to view the structure of the table:
DESCRIBE student_management;
The SQL DESCRIBE command shows the structure of a table (columns, data types, constraints). The school_db is a database name, so it cannot be used with DESCRIBE.
Output:
Examples of Creating Tables in MySQL
Let’s take some examples where we create tables using constraints, AUTO_INCREMENT, default values, and multiple constraints.
Example 1: Create a Simple Table
CREATE TABLE students (
    id INT,
    name VARCHAR(50),
    age INT
);
In this example:
- id INT → Stores student ID as an integer.
- name VARCHAR(50) → Stores name up to 50 characters.
- age INT → Stores age as a number.
Example 2: Create Table with PRIMARY KEY
CREATE TABLE students (
    id INT PRIMARY KEY,
    name VARCHAR(100),
    age INT
);
In this example:
- id is the name of the column.
- INT stores numeric values only.
- PRIMARY KEY ensures each value must be unique and cannot contain NULL values.
- name VARCHAR(100) stores student names up to 100 characters.
- age INT stores the age of the student.
Example 3: Create Table with AUTO_INCREMENT
CREATE TABLE students (
    id INT AUTO_INCREMENT PRIMARY KEY,
    name VARCHAR(100),
    age INT
);
In this example:
- AUTO_INCREMENT automatically generates sequential values (1, 2, 3, …). You do no need to insert ID manually. Therefore, AUTO_INCREMENT is useful when you want automatic IDs.
- PRIMARY KEY works together with AUTO_INCREMENT.
Example 4: Create Table with NOT NULL Constraint
CREATE TABLE employees (
    id INT AUTO_INCREMENT PRIMARY KEY,
    name VARCHAR(100) NOT NULL,
    salary INT
);
In this example, NOT NULL is a constraint in MySQL, which means the column must always contain a value and cannot be left empty. You must provide a value while inserting data. If you try to insert a record without a name, MySQL will give an error.
Example 5: Create Table with UNIQUE Constraint
CREATE TABLE users (
    id INT AUTO_INCREMENT PRIMARY KEY,
    email VARCHAR(100) UNIQUE,
    username VARCHAR(50)
);
In this example, we have used the UNIQUE constraint, which means all values in a column must be different. No duplicates are allowed. Each email must be different and duplicate emails are not allowed.
Example 6: Create Table with Multiple Constraints
CREATE TABLE student_management (
    student_id INT AUTO_INCREMENT PRIMARY KEY,
    student_name VARCHAR(100) NOT NULL,
    email VARCHAR(100) UNIQUE,
    age INT CHECK (age >= 18),
    course VARCHAR(50) DEFAULT 'General'
);
In this example:
- student_id INT AUTO_INCREMENT PRIMARY KEY
- student_id is the column name used to uniquely identify each student.
- AUTO_INCREMENT automatically generates a new value for each record (1, 2, 3, …).
- PRIMARY KEY ensures that each value must be unique and no NULL values are allowed.
- student_name VARCHAR(100) NOT NULL
- student_name stores the name of the student.
- NOT NULL means this field cannot be empty. It is a mandatory field.
- email VARCHAR(100) UNIQUE
- Email stores the student’s email address.
- UNIQUE ensures that no duplicate emails are allowed.
- course VARCHAR(50) DEFAULT ‘General’
- course stores the course name.
- DEFAULT ‘General’ means if no value is provided, it will automatically be set to ‘General’. It assigns a default value when data is missing.